
Quick Links
Introduction
In this quick guide, we are going to explain how to share snapshots between two deployments in one Elastic Cloud account or between two different Elastic Cloud accounts. Sharing snapshots can be an efficient way of bootstrapping a new Elastic Cloud deployment instead of having to reindex the data over the HTTP wire, which usually takes much longer depending on the volume of data.
Using the same account
When you create a new deployment in your Elastic Cloud account, a default snapshot repository called `found-snapshots` is automatically created and a default snapshot lifecycle management policy called `cloud-snapshot-policy` is configured to back up your index data every four hours. Within your Elastic Cloud account, you can access each of your deployment snapshot repositories from any other deployment if needed.
New deployment
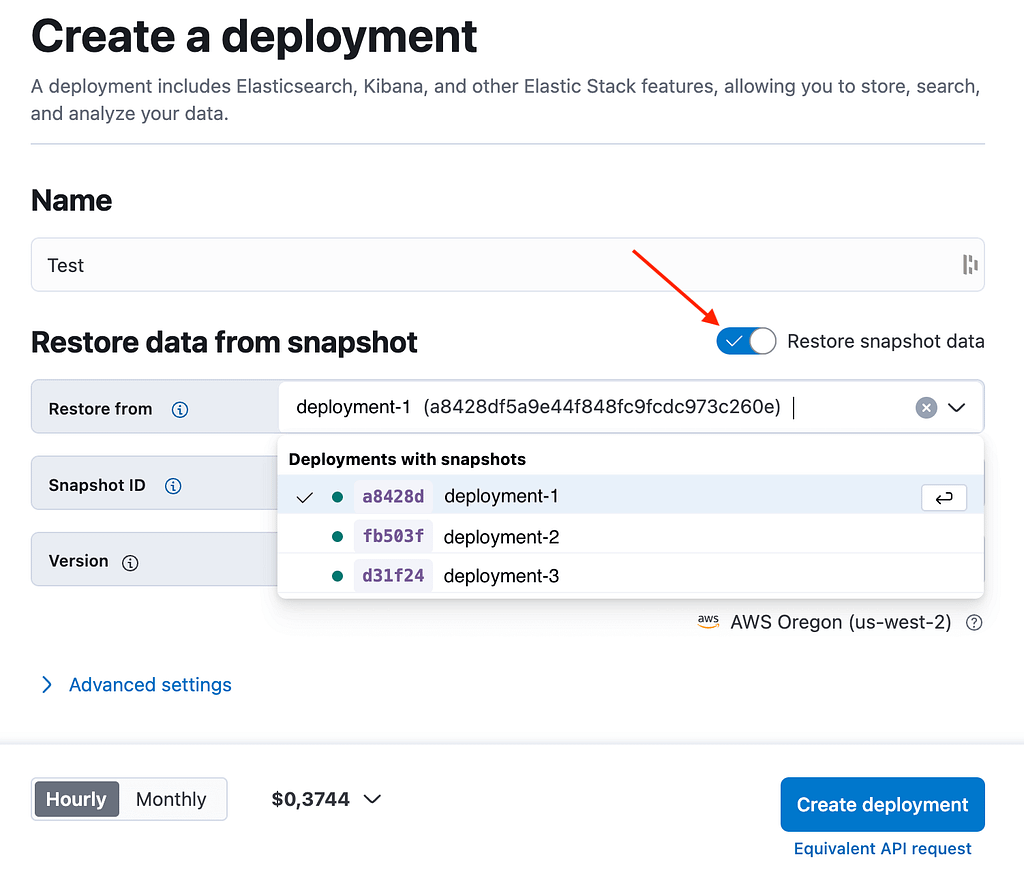
You can create a new deployment within the same account by sourcing an existing snapshot from any other deployment present in that account, as can be seen in Figure 1, below:
Figure 1: Creating a new deployment by sourcing an existing snapshot
Existing deployment
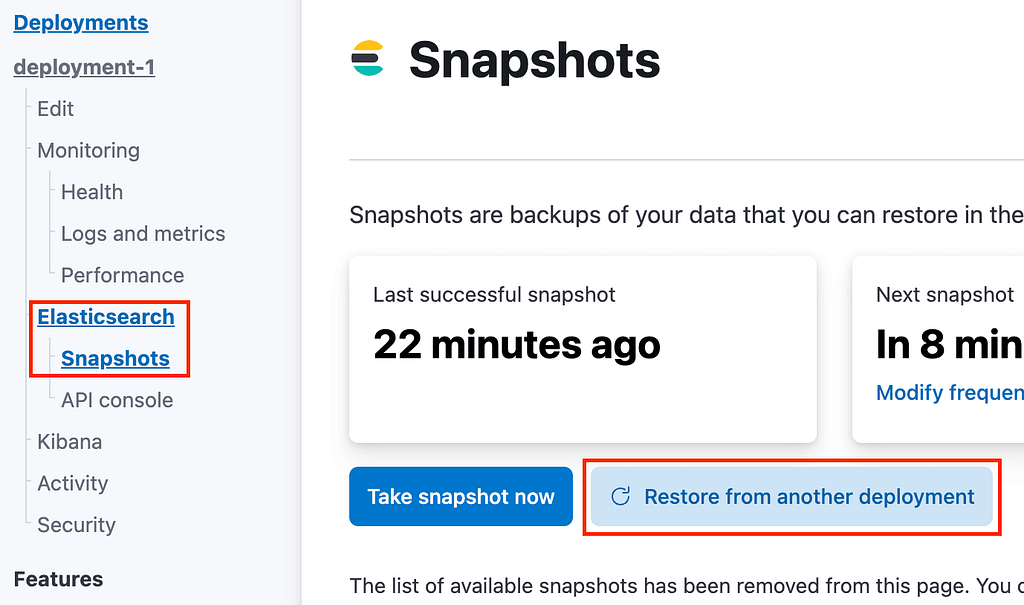
If you are not creating a new deployment, you can simply restore data from a snapshot that exists in another deployment present in your account. In your Elastic Cloud console, just head over to the Deployments menu, go to Elasticsearch, and then click on Snapshots. On the resulting Snapshots screen, you can click on the “Restore from another deployment” button as shown in Figure 2, below.
Figure 2: Restoring a snapshot into an existing deployment
The dialog that pops up next (which is not shown here) will allow you to choose the deployment from which you would like to restore a snapshot, in a very similar manner to what we saw in Figure 1.
Using different Elastic Cloud accounts
In each of your deployments, the default managed snapshot repository stores data in an S3 bucket that is out of your reach because it uses an S3 client whose access and secret keys are owned by Elastic and are specific to your Elastic Cloud account. This means that there is no way for you to access those snapshots from another Elastic Cloud account. However, if you need to share data between different Elastic Cloud accounts, there is a way to do it. You simply need to create another snapshot repository that you can store in an object storage location under your control (e.g., AWS S3, Google GCS, Azura Storage, Minio, etc.)
Configuring the source deployment in account A
The first thing you need to do is create a new repository in the source deployment from which you are going to back up your data. There are two ways to do this: 1) by leveraging the Snapshot API directly through the Kibana Dev Tools or 2) by using the Kibana Snapshot and Restore UI for a more intuitive user experience (available from the “Stack Management > Snapshot and Restore > Repositories” menu). For reproducibility’s sake and also because it’s a lot more fun, we go for option 1.
For this guide, we are going to store data in AWS S3, but we won’t go into the details of how to create a new bucket and where you need to go to retrieve your access and secret keys, AWS has excellent documentation on that topic that you can refer to if needed.
As the access and secret keys need to be kept in a secure location, they must be stored in the Elasticsearch keystore. However, there is no way to access the filesystem of your nodes on Elastic Cloud, and hence, no way to run the `elasticsearch-keystore` tool directly to manage your secure settings. Don’t worry, the Elastic Cloud console has you covered.
In your Elastic Cloud console, go to the Deployments menu and click on the “Security” item of your deployment. The Security page allows you to add secure settings to your keystore, as shown in Figure 3, below:
Figure 3: Managing the secure settings of your deployment
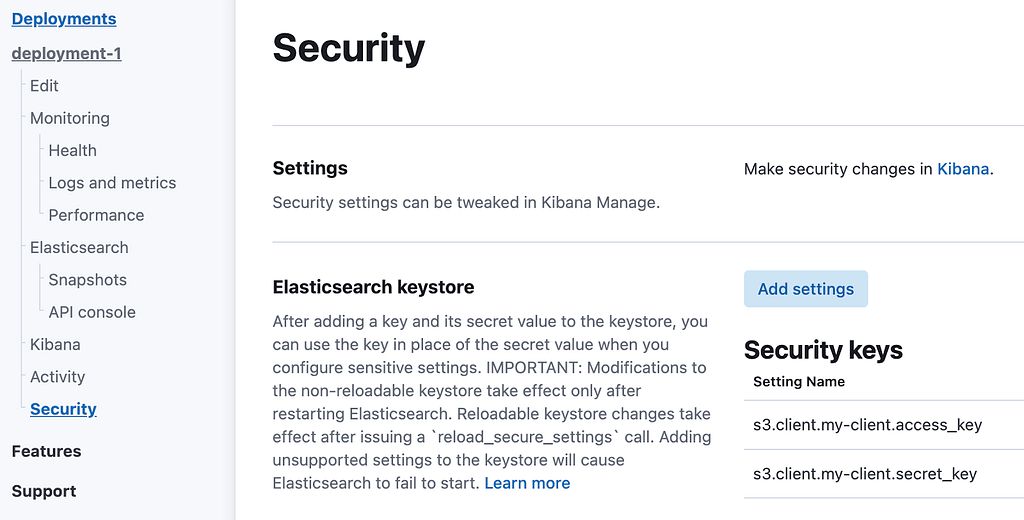
By clicking on the “Add settings” button, you can manage your secure settings. As shown in Figure 3, we have added two secure settings called `s3.client.my-client.access_key` and `s3.client.my-client.secret_key`, which contain our AWS access key and our secret key, respectively. It is worth noting that these two secure settings are reloadable, i.e., they can be changed dynamically without restarting your nodes, but you will need to call the `reload_secure_settings` API in order for the changes to take effect. Also, the part in bold in the example above (i.e., `my-client`) can be whatever you like, in case you have several different repositories to manage. We’re going to use that string in a moment when we create the repository.
Now that we have our S3 bucket and our keys are stored securely and available to our deployment, we can finally proceed with the snapshot repository creation. The command to create a new repository is very simple, as shown in the code below:
PUT _snapshot/my-shared-repository
{
  "type": "s3",
  "settings": {
    "bucket": "my-bucket",
    "base_path": "folder/subfolder",
    "client": "my-client",
    "readonly": "false"
  }
}
We declare a new repository called `my-shared-repository` (line 1) that we are going to store in AWS S3 (line 3) within the path `folder/subfolder` (line 6) of a bucket called `my-bucket` (line 5). The `client` setting (i.e., recall `my-client`) identifies the access and secret keys that we added to our keystore earlier which the S3 client is going to use. We also set `readonly` to false since we are going to populate this repository from this deployment. That’s it, our custom repository is created and we can start creating snapshots in it.
Configuring the target deployment in account B
Now, we head over to our second Elastic Cloud account and we perform the exact same steps. We need to store the access and secret keys in our Elastic Cloud keystore and create the same repository, but this time with a slight variation, as can be seen in the code below:
PUT _snapshot/my-shared-repository
{
  "type": "s3",
  "settings": {
    "bucket": "my-bucket",
    "base_path": "folder/subfolder",
    "client": "my-client",
    "readonly": "true"
  }
}
As it is not advised to write to the same repository from two different deployments, it is good practice to set the `readonly` flag to `true` (line 8) for deployments that only access the repository to read the data.
And we’re done! We can now restore snapshots created from within the source deployment in account A into our target deployment in account B.
Conclusion
In this quick guide, we have seen how to share snapshots between deployments available in your Elastic Cloud account, as well as between deployments available in different Elastic Cloud accounts, by using a shared object storage repository under our control.
We have also seen how to set up such a shared repository and how to securely store the access and secret keys to interact with it. Now, you can freely share your data among all your deployments without having to reindex it.