
Quick Links
- Overview
- What is Sentiment Analysis?
- NLP in Elasticsearch
- A Small POC
- Putting Everything Together
- Conclusion
Overview
In this blog, we will dive into the powerful world of Natural Language Processing (NLP) and Sentiment Analysis using Elasticsearch. We’ll explore how you can harness Elasticsearch to extract valuable insights from unstructured text data. This technical deep dive will demonstrate how Elasticsearch’s robust machine learning (ML) features can implement sentiment analysis, while covering key concepts, from setting up Elasticsearch for NLP tasks to designing efficient queries that reveal sentiment trends in your data.
We’ll start by importing example data from the IMDB Dataset of Movie Reviews and selecting a trained model for sentiment analysis. Next, we will import both the model itself and its associated vocabulary, deploy it, and optimize it for real-time analysis of textual data. Finally, we’ll illustrate the entire process by running sentiment analysis queries and visualizations on the data.
To run this example, we will need an Elasticsearch cluster running at least version 8.0 and an ML node with at least 2GB RAM. While ML is a paid feature, you can access it for free during a trial period or by upgrading to a platinum (or higher) subscription level.
If you just can’t wait to see the results, go to Putting Everything Together and remember to come back and read this article while your messages are being processed 😉
What is Sentiment Analysis?
Text classification is a natural language processing (NLP) task in machine learning (ML) where the goal is to automatically categorize or assign predefined labels or categories to a given text. It’s one of the fundamental tasks in NLP and has a wide range of applications, including:
- Sentiment Analysis: Determining the sentiment or emotional tone of a piece of text, such as whether a customer review is positive, negative, happy, angry, sad, etc.
- Topic Classification: Categorizing news articles, blog posts, or social media posts into topics or themes, such as sports, politics, technology, etc.
- Spam Detection: Identifying whether an email or message is or isn’t spam.
Language Detection: Determining the language of a given text.
Model Selection
Sentiment analysis has the following categories:
- Binary Sentiment Analysis: In binary sentiment analysis, text is classified as either positive or negative.
- Multiclass Sentiment Analysis: In multiclass sentiment analysis, text can be classified into multiple sentiment categories, such as positive, neutral, and negative, or even more granular emotions like happy, sad, angry, etc.
Since this blog will be looking at movie reviews, and whether these are positive or negative, we’ll be using Binary Sentiment Analysis.
Among listed compatible text classification models, there are too many to cover here, given the number of specifications of parameters, resources, methods (zero shot), and problem complexity. Since the main goal is to run it as fast as possible using minimal resources, we’ll be using the ~200MB model distilbert-base-uncased-finetuned-sst-2-english (for a comparison, the zero shot distilbart-mnli-12-6 is ~1.2GB).
This model is a fine tuned version of DistilBERT and has great accuracy (model card).
NLP in Elasticsearch
Elastic Stack 8.0 introduced the ability to upload machine learning models from PyTorch — a popular framework. That means we now have extra tools to extract information, classify, search, and compare text, etc… The best part is, there are many models suited for a variety of tasks, that are already trained, so there’s no need to reinvent the wheel, we can simply select and import it, using Hugging Face, for example.
We’ll be using Eland to import models.
Importing and Running Using the Eland Tool
python -m pip install 'eland[pytorch]'

eland_import_hub_model
--url <es_url> \
-u <username> -p <password> \
--hub-model-id distilbert-base-uncased-finetuned-sst-2-english \
--task-type text_classification \
--start
Command explanations:
- –url: Elasticsearch cluster URL
- -u / -p: authentication if needed
- –hub-model-id: the model id we’re importing, we’re referring to this model in the example above
- –task-type: Specify the type of NLP task, the task we need in order to deploy sentiment analysis is text_classification. Supported values are fill_mask, ner, question_answering, text_classification, text_embedding, and zero_shot_classification. We will not get into too much detail here, but feel free to look for more details and examples here
- –start: Is a command used to deploy and start the model to all available machine learning nodes, and load the model in memory
The first command will install Eland and the second will import, deploy and start the selected model.
A Small POC
Starting on 8.2, kibana provides a UI, under Machine Learning > Trained Models where we can test our model. But, for the sake of reproducibility, we will be using APIs instead — you can run all these commands on Kibana > DevTools.
Check That the Model is Running
Using the trained_models API we can request _stats to retrieve details about the model current status. As we can see below, current state is running. As expected, –start flag already started the model for us.
GET /_ml/trained_models/distilbert-base-uncased-finetuned-sst-2-english/_stats

# output
{
  "count": 1,
  "trained_model_stats": [
    {
      "model_id": "distilbert-base-uncased-finetuned-sst-2-english",
      "deployment_stats": {
        "state": "started",...
Test the Model
As the test is up and running, we can try it, using the same API, but this time on _infer endpoint, adding the text to be evaluated as payload.
POST /_ml/trained_models/distilbert-base-uncased-finetuned-sst-2-english/_infer
{
  "docs":[{"text_field": "I don't like it"}]
}

# output
{
  "inference_results": [
    {
      "predicted_value": "NEGATIVE",
      "prediction_probability": 0.9978170831094646
    }
  ]
}
It’s pretty cool to see an imported model running and providing expected results, isn’t it? So, now it’s time to test it on a large dataset.
Importing a Dataset
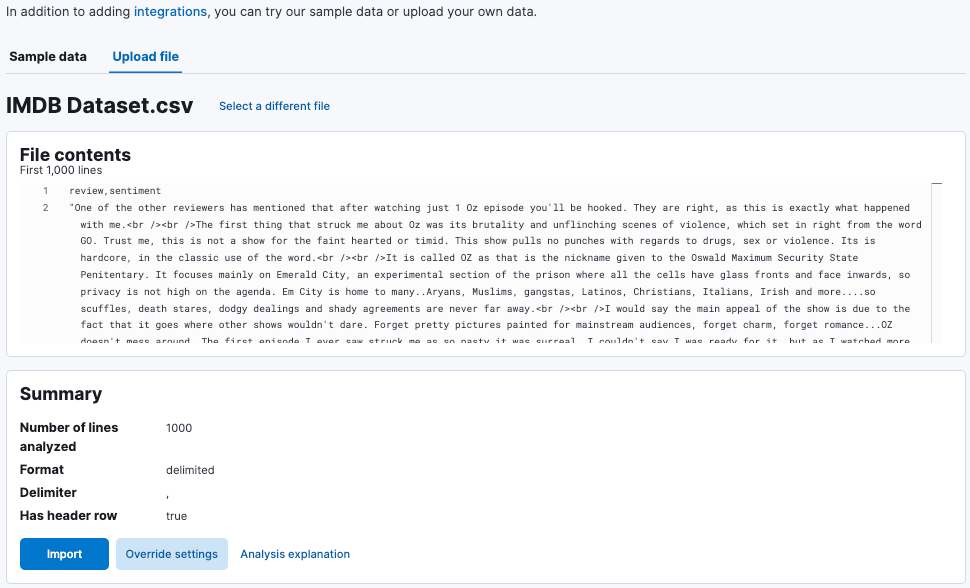
For the next step, we’ll download the IMDB Dataset with 50K movie reviews, yet before downloading it you may have to create an account.
After it downloads, we must ingest each line of the CSV file as a document into Elasticsearch. To do that we need to parse the file and convert to json (expected format for Elasticsearch) in a production environment using filebeat or a similar service to execute this task.
We will be using kibana file upload. After importing the file we’ll need to add the index name, we will call our index imdb_index.
Analyzing Ingested Data on Elasticsearch
To use the trained model we must use the _infer endpoint, like we did above, meaning that if we wish to analyze the reviews we imported we must use the review field of each document, as input on our trained model. To do so, we must create and configure an ingest pipeline to use the trained model on the expected field.
Also, since the data is already imported into Elasticsearch, the best option to make all documents go through the ingest pipeline is to reindex the data, so every document on index imdb_index will be processed using our trained model.
During this process, Elastic will read data from source index (imdb_index), use the review field of the document as input of trained model on _infer endpoint, and will store resulting data in a new destination index.
Ingest Pipeline
In order to analyze the dataset, the first step is to create the ingest pipeline using our trained model.
Ingest pipeline is a data workflow Elasticsearch applies to the data before indexing it. In this example, we’ll define the pipeline on the reindex command.There are dozens of built-in processors and is inference one of them, where we can define the model we wish to use to process the data.
PUT _ingest/pipeline/sentiment-analysis
{
  "processors": [
    {
      "inference": {
        "model_id": "distilbert-base-uncased-finetuned-sst-2-english",
        "field_map": {
          "review": "text_field"
        }
      }
    }
  ]
}
In the command above we named our ingest pipeline sentiment-analysis and used the parameter, field_map to tell the trained model which field we wanted evaluated. Since the model is expecting the input on text_field, we send the content of the review to it.
Reindex
The last step to process the dataset with the trained model is to ingest documents using the newly created ingest pipeline.
Since we imported the dataset using the convenient kibana kibana feature, now we need to reprocess (reindex) the data, but this time telling Elastic to process documents with our pipeline.
Every document in Elasticsearch is immutable because they are processed during the time of ingestion, so whenever we wish to update/modify them, we must delete the original and write another document in its place.
The reindex command will not modify documents, instead it will only create new documents based on the source data.
The command is simple, we just need to specify the source, destination, and optional parameters, like the pipeline name, and the data will be processed accordingly.
POST _reindex?wait_for_completion=false
{
  "source": {
    "index": "imdb_index"
  },
  "dest": {
    "index": "imdb_analyzed",
    "pipeline": "sentiment-analysis"
  }
}
The parameter wait_for_completion is used to indicate whether Elasticsearch will return the command output or the command acknowledgement only.
In order to track the command status and output, given that it’s running on asynchronous mode (wait_for_completion=false), we can use _tasks endpoint:
GET _tasks?actions=*reindex
You’ll find the process might be a bit slow, yet that happens due to two main factors:
- Machine learning node resources
- Number of allocations (tasks in parallel) the model can run.
Usually, we can increase throughput by increasing the number of allocations per node if we have the resources for it.
In a 4GB machine learning node, you’ll probably be able to add up to 10 allocations:
POST _ml/trained_models/distilbert-base-uncased-finetuned-sst-2-english/deployment/_update
{
  "number_of_allocations": 10
}
Results
After a few seconds, you’ll be able to see the first results by querying the destination index we configured on the reindex command:
GET imdb_analyzed/_search
You will notice that the documents processed by the model will include an extra field, which will by default be ml, where the model output will be ingested. Here’s an example:
"ml": {
 "inference": {
  "predicted_value": "NEGATIVE",
  "prediction_probability": 0.5121189606322548,
  "model_id": "distilbert-base-uncased-finetuned-sst-2-english"
 }
          }
The model output will display:
- model_id – The model used, in this case, for sentiment analysis
- prediction_probability – A statistical measure that indicates the level of confidence associated with model categorization
- predicted_value – The category name, based on model prediction_probability
GET imdb_analyzed/_search
{
  "_source": ["sentiment", "ml.inference.predicted_value"]
}
In this query we’re requesting only the value of sentiment (the field present on original CSV file) and ml.inference.predicted_value (the predicted value for the review of the document), and
this is how each document on the output will look:
"sentiment": "positive",
"ml": {
 "inference": {
  "predicted_value": "POSITIVE"
 }
}
The following visualization shows all aggregate results, and we can see how precise our model is:
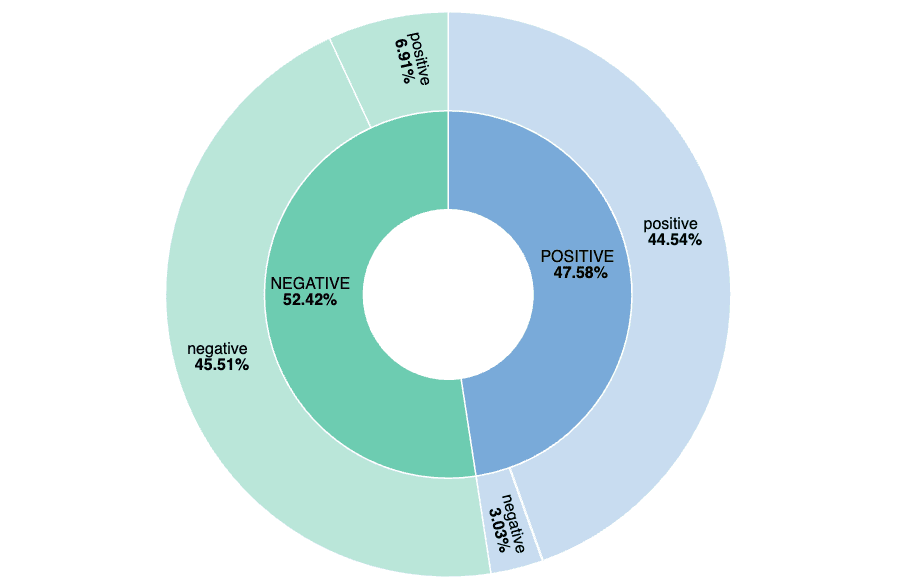
In this chart we’re comparing values of sentiment, labeled opinions from the CSV, and predicted_value, on the outside of what the inference model predicted. When we have different values that means we have either a false negative (6.91%) or false positive (3.03%).
Putting Everything Together
We’ve presented several commands and explanations to guide you through the whole process, and here is a github repository with a docker-compose file you can use to run the POC and all required commands in just a few steps:
# 1. Clone this repository
git clone https://github.com/Opster/ML-examples
# 2. Enter the sentiment-analysis folder
cd ML-examples/sentiment-analysis/
# 3. Run docker-compose build and run commands
docker-compose build
docker-compose up -d
Conclusion
We’ve explored the powerful capabilities of Natural Language Processing (NLP) and Sentiment Analysis using Elasticsearch for text classification. This technical deep dive has shown how Elasticsearch’s + trained models are robust features that can enrich our data even more. We began by importing example data from the IMDB Dataset of Movie Reviews, selected a suitable pre-trained model, and deployed it using the Eland tool. We then illustrated the entire process, from checking the model’s status to predicting sentiment.
The practical steps included parsing and ingesting the IMDB, creating an ingest pipeline to apply the trained model, and reindexing the data, where the example repository was slightly different, using filebeat for parsing, without the reindex step. The result was a valuable tool for extracting sentiment insights from text data that is easily replicable.