
Quick Links
Overview
Elasticsearch sorting allows you to order your search results based on specific criteria. However, when handling case sensitivity in sorting, Elasticsearch treats uppercase and lowercase letters as different characters, sorting them separately. This is because of the ASCII table order, which goes from uppercase A to lowercase z.
By default, Elasticsearch sorts strings in the following order: numbers first, then uppercase letters, and finally lowercase letters. For instance, if you have the terms “Apple,” “apple,” “banana,” “Carrot,” and “1apple,” they would be sorted in ascending order as “1apple,” “Apple,” “Carrot,” “apple,” “banana.”
POST /test_casing/_bulk
{ "index" : {} }
{ "my_field" : "Apple" }
{ "index" : {} }
{ "my_field" : "apple" }
{ "index" : {} }
{ "my_field" : "banana" }
{ "index" : {} }
{ "my_field" : "Carrot" }
{ "index" : {} }
{ "my_field" : "1apple" }


GET /test_casing/_search
{
  "size": 0,
  "aggs": {
    "my_terms": {
      "terms": {
        "field": "my_field.keyword"
      }
    }
  }
}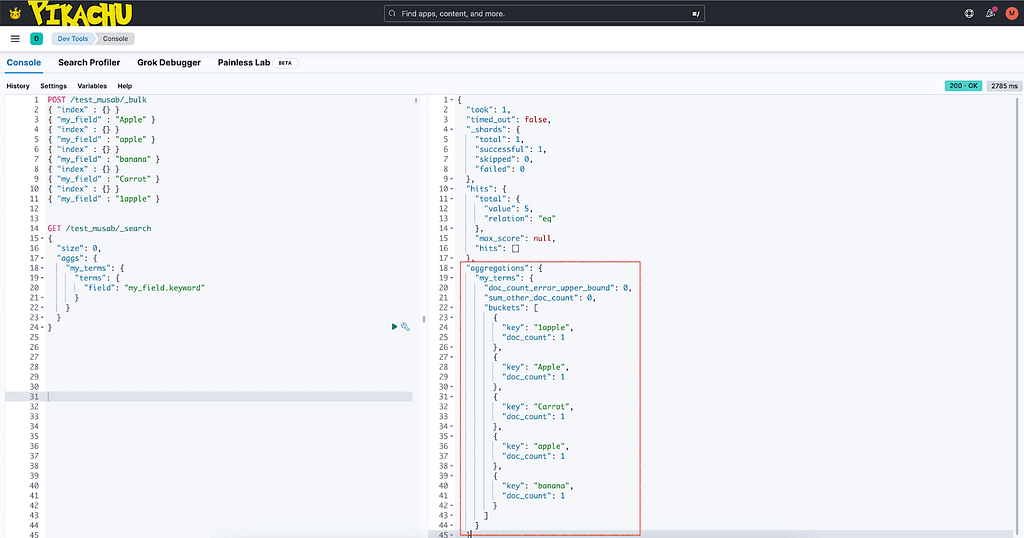
This default behavior might not always be desirable. For example, if you have indexed the values “Apple,” “banana,” and “Carrot,” and you’re using ascending order, you would get “Apple,” “Carrot,” “banana.” However, you might want to get “Apple,” “banana,” “Carrot” instead.
To achieve that, you can use a feature in Elasticsearch called a normalizer. A normalizer is used with the keyword field type and allows you to preprocess the input of keyword fields in a way that’s similar to analyzing text.
However, unlike analyzers, a normalizer does not break the input into tokens. This makes it suitable for keyword field types where the entire input needs to be indexed or sorted.
PUT /test_casing2
{
  "settings": {
    "analysis": {
      "normalizer": {
        "my_normalizer": {
          "type": "custom",
          "filter": ["lowercase"]
        }
      }
    }
  },
  "mappings": {
    "properties": {
      "my_field": {
        "type": "keyword",
        "normalizer": "my_normalizer"
      }
    }
  }
}

POST /test_casing2/_bulk
{ "index" : {} }
{ "my_field" : "Apple" }
{ "index" : {} }
{ "my_field" : "banana" }
{ "index" : {} }
{ "my_field" : "Carrot" }

GET /test_casing2/_search
{
  "size": 0,
  "aggs": {
    "my_terms": {
      "terms": {
        "field": "my_field"
      }
    }
  }
}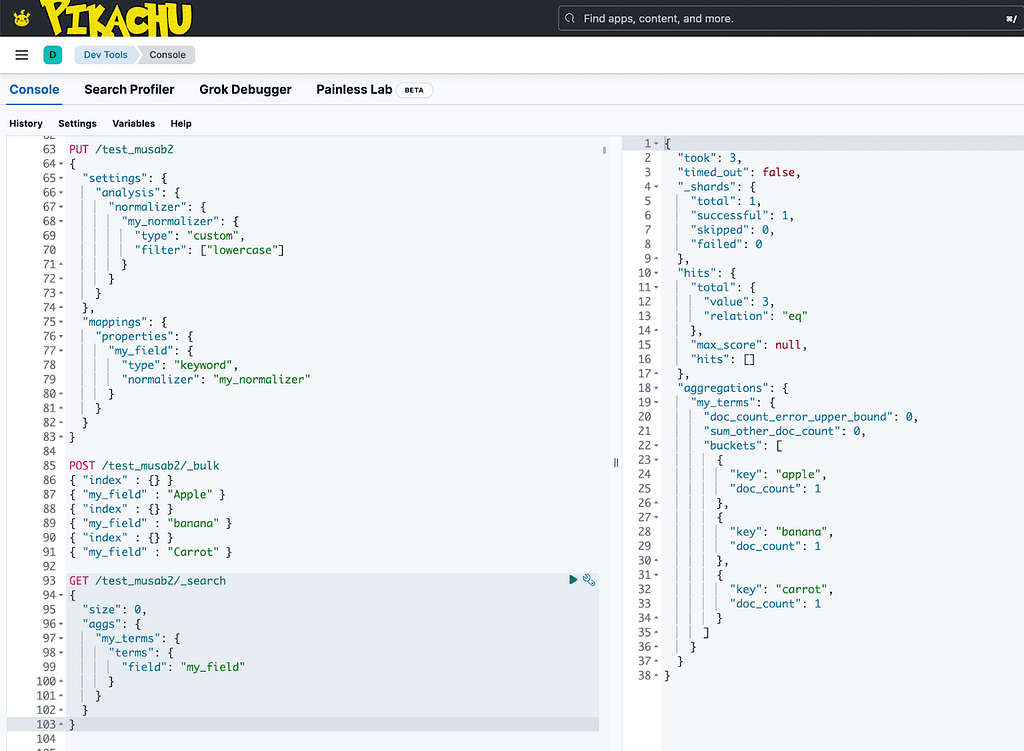
It’s important to note that using a normalizer will change the values in your index. If you want to keep the original values, such as “Apple” with a capital “A,” you can use sub-fields. That allows you to keep both the original and normalized field values. In the aggregation results, Elasticsearch will only show the field that you used in the aggregation.
Unfortunately, Elasticsearch does not support case-insensitive sorting directly in the terms aggregation. Even with the use of script aggregations and normalizers, it’s not possible to sort in a case-insensitive manner and display the result with case sensitivity. This is a limitation that users should be aware of when working with Elasticsearch.
How can you add a normalizer to an existing index?
Let’s look at a practical example of the process of adding a normalizer to an existing index in Elasticsearch. This process involves several steps: closing the index, updating the settings, reopening the index, updating the mapping, updating the data index, and finally, running a query.
First, you need to close the index using the following command:
POST test_casing/_close
Next, you update the settings of the index to add the normalizer. In this case, we’re adding a custom normalizer that applies a lowercase filter:
PUT test_casing/_settings
{
  "analysis": {
    "normalizer": {
      "my_normalizer": {
        "type": "custom",
        "filter": ["lowercase"]
      }
    }
  }
}
After updating the settings, you can reopen the index:
POST test_casing/_open
Now, you need to update the mapping of the index to use the normalizer. Here, we’re adding a sub-field to “my_field” that uses the normalizer:
PUT test_casing/_mapping
{
  "properties": {
    "my_field": {
      "type": "text",
      "fields": {
        "normalized": {
          "type": "keyword",
          "normalizer": "my_normalizer"
        }
      }
    }
  }
}
Note that my_field.normalized is the field name.
Next, you can update the data index by running update_by_query, which will add data inside of the my_field.normalized field:
POST test_casing/_update_by_query
Finally, you can run a search query on the index. In this case, we’re running an aggregation on the new normalized field:
GET /test_casing/_search
{
  "size": 0,
  "aggs": {
    "my_terms": {
      "terms": {
        "field": "my_field.normalized"
      }
    }
  }
}
This process demonstrates how you can add a normalizer to an existing index in Elasticsearch, allowing you to handle case sensitivity with greater flexibility.

Conclusion
In conclusion, while Elasticsearch provides powerful features for handling and manipulating data, it’s important to understand its limitations and how to work around them. Using features like normalizers and sub-fields can help you achieve the desired results.