
Quick links
Overview
We will be reviewing several ways users can ingest data into an Elasticsearch cluster. Each approach has advantages and specific uses. Learning about each one will allow users to choose the one that suits them better. If you’d like to follow along with the actions below, see the section below about bringing up a test environment.
How to ingest data into Elasticsearch
We’ll explore how you can ingest data into an Elasticsearch cluster. We’ll be using the example dataset detailed in the “Test environment” section below.
Hint: we used my.elasticsearch.host as the Elasticsearch host throughout the examples. Please change it to your Elasticsearch host endpoint before running the examples.
Using the document index API
The first way you’ll probably ingest data into Elaticsearch is by using the document index API. This is an endpoint available in Elasticsearch’s REST API with which you can send a JSON document to the cluster and where it will be indexed. Because it is an endpoint available via REST, you can call it using many different ways. In fact, you can use any tool that allows you to make an HTTP request. But you’ll most likely use one of two different approaches to call this API.
Whether you’re just beginning your journey with Elasticsearch, or whether you’re an experienced user, you’ll probably spend loads of time in Kibana’s Dev Tools app, or, more specifically in the console section of Dev Tools. Not only does it offer a shortcut to sending REST requests to the cluster, but with Dev Tools you’ll also see the cluster’s response in a pretty formatted way, have access to autocomplete capabilities, and much more.
You can access the Dev Tools console by logging into Kibana and selecting the Dev Tools option beneath Management in the side menu, or just by going to http://<kibana host>:5601/app/dev_tools#/console. TheDev Tools console looks like this:
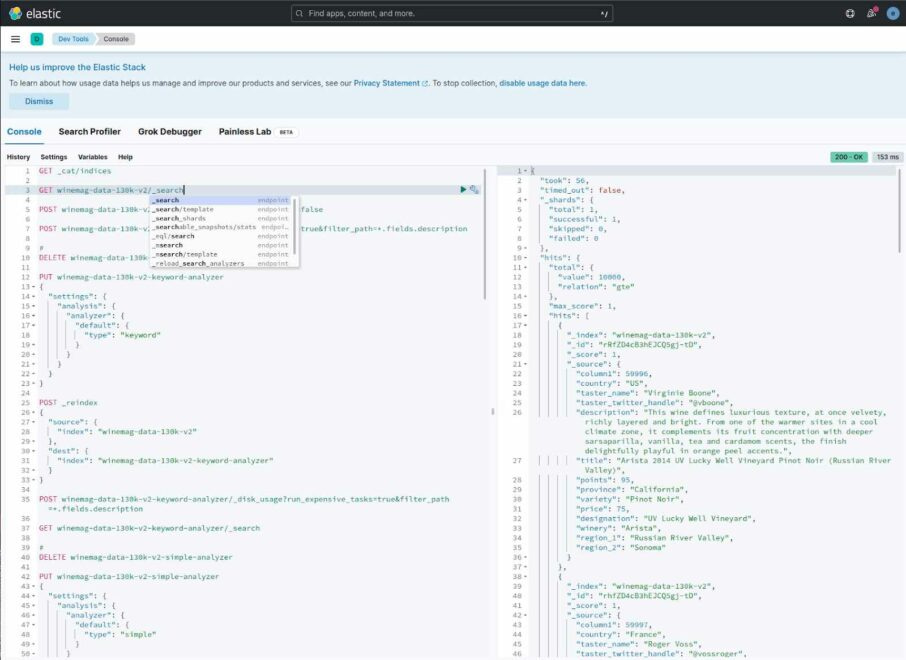
Notice that you will need to specify the HTTP verb and endpoint when issuing commands in the Dev Tools console, but there’s no need to specify the Elasticsearch cluster host.
The second approach you can use to call the document index API is to use an HTTP tool. It can be either command-line based, such as curl or wget, or a UI, such as Postman or Insomnia. However, in this case adjustments will be required.
First of all, you’ll need to know and inform your cluster’s host. Also, if you are running a cluster with TLS, you may have to provide additional options.
Here’s an example of how you would use the curl command line utility to make a request to an Elasticsearch cluster available at my.elasticsearch.host:9200. We are making a search request and want the size of the result to be limited to only one document. We’d also like the output to be pretty formatted.
curl -XGET -k -u elastic 'https://my.elasticsearch.host:9200/winemag-data-130k-v2/_search?size=1&pretty'
Enter host password for user 'elastic':
{
  "took" : 0,
  "timed_out" : false,
  "_shards" : {
    "total" : 1,
    "successful" : 1,
    "skipped" : 0,
    "failed" : 0
  },
  "hits" : {
    "total" : {
      "value" : 10000,
      "relation" : "gte"
    },
    "max_score" : 1.0,
    "hits" : [
      {
        "_index" : "winemag-data-130k-v2",
        "_id" : "rRfZD4cB3hEJCQ5gj-tD",
        "_score" : 1.0,
        "_source" : {
          "column1" : 59996,
          "country" : "US",
          "taster_name" : "Virginie Boone",
          "taster_twitter_handle" : "@vboone",
          "description" : "This wine defines luxurious texture, at once velvety, richly layered and bright. From one of the warmer sites in a cool climate zone, it complements its fruit concentration with deeper sarsaparilla, vanilla, tea and cardamom scents, the finish delightfully playful in orange peel accents.",
          "title" : "Arista 2014 UV Lucky Well Vineyard Pinot Noir (Russian River Valley)",
          "points" : 95,
          "province" : "California",
          "variety" : "Pinot Noir",
          "price" : 75.0,
          "designation" : "UV Lucky Well Vineyard",
          "winery" : "Arista",
          "region_1" : "Russian River Valley",
          "region_2" : "Sonoma"
        }
      }
    ]
  }
}
Now that we know how to send a request to the cluster, let’s take a look at the document index API. This API can create or overwrite a single document and is available through the following endpoints:
PUT /<target>/_doc/<_id>


POST /<target>/_doc/


PUT /<target>/_create/<_id>


POST /<target>/_create/<_id>
You can use either POST or PUT as the HTTP verb. Here, target refers to where the document should be indexed. It can be either an index, an alias, or a data stream. You don’t need to create the target previous to indexing documents, Elasticsearch will take care of that for you.
The difference between sending a request to the _doc or the _create endpoints is that the first will overwrite the document and generate a new version, when you provide an existing document ID. On the other hand, the _create endpoint will fail if a document with the same id already exists.
In the example below we are using the jq utility to extract the first item from the JSON array stored in the winemag-data-130k-v2.json file. If you don’t have access to this utility, you can extract the document manually, save it into a file (first-document.json), and then pass this file as the value for curl’s –data-binary parameter (–data-binary @first-document.json).
jq -cM '.[0]' winemag-data-130k-v2.json | curl -XPOST -H'Content-type: application/json' --data-binary @- -k -u elastic 'https://my.elasticsearch.host:9200/winemag-curl/_doc/?pretty'
Enter host password for user 'elastic':
{
  "_index" : "winemag-curl",
  "_id" : "ehz-uIcB3hEJCQ5gKvTk",
  "_version" : 1,
  "result" : "created",
  "_shards" : {
    "total" : 2,
    "successful" : 1,
    "failed" : 0
  },
  "_seq_no" : 0,
  "_primary_term" : 1
}
You can see in the response that Elasticsearch created an index for us, since one didn’t exist, and it then created a document with id ehz-uIcB3hEJCQ5gKvTk in the winemag-curl index.
We can now retrieve the document directly using its id:
curl -XGET -k -u elastic 'https://my.elasticsearch.host:9200/winemag-curl/_doc/ehz-uIcB3hEJCQ5gKvTk?pretty'
Enter host password for user 'elastic':
{
  "_index" : "winemag-curl",
  "_id" : "ehz-uIcB3hEJCQ5gKvTk",
  "_version" : 1,
  "_seq_no" : 0,
  "_primary_term" : 1,
  "found" : true,
  "_source" : {
    "points" : "87",
    "title" : "Nicosia 2013 Vulkà Bianco  (Etna)",
    "description" : "Aromas include tropical fruit, broom, brimstone and dried herb. The palate isn't overly expressive, offering unripened apple, citrus and dried sage alongside brisk acidity.",
    "taster_name" : "Kerin O’Keefe",
    "taster_twitter_handle" : "@kerinokeefe",
    "price" : null,
    "designation" : "Vulkà Bianco",
    "variety" : "White Blend",
    "region_1" : "Etna",
    "region_2" : null,
    "province" : "Sicily & Sardinia",
    "country" : "Italy",
    "winery" : "Nicosia"
  }
}
Let’s see what happens if we try to index the second document using the _create endpoint, yet forcing the document to have the same ID as the one we just indexed:
jq -cM '.[1]' winemag-data-130k-v2.json | curl -XPOST -H'Content-type: application/json' --data-binary @- -k -u elastic 'https://my.elasticsearch.host:9200/winemag-curl/_create/ehz-uIcB3hEJCQ5gKvTk?pretty'
Enter host password for user 'elastic':
{
  "error" : {
    "root_cause" : [
      {
        "type" : "version_conflict_engine_exception",
        "reason" : "[ehz-uIcB3hEJCQ5gKvTk]: version conflict, document already exists (current version [1])",
        "index_uuid" : "GkobeGoqTZyK4u4xDpOH4A",
        "shard" : "0",
        "index" : "winemag-curl"
      }
    ],
    "type" : "version_conflict_engine_exception",
    "reason" : "[ehz-uIcB3hEJCQ5gKvTk]: version conflict, document already exists (current version [1])",
    "index_uuid" : "GkobeGoqTZyK4u4xDpOH4A",
    "shard" : "0",
    "index" : "winemag-curl"
  },
  "status" : 409
}
Predictably, the request fails due to a “document already exists” error.
However, keep in mind that you could have run the same commands in the Kibana Dev Tools console. Here’s how they would look like in the console:
POST /winemag-curl/_doc
{
  "points": "87",
  "title": "Nicosia 2013 Vulkà Bianco  (Etna)",
  "description": "Aromas include tropical fruit, broom, brimstone and dried herb. The palate isn't overly expressive, offering unripened apple, citrus and dried sage alongside brisk acidity.",
  "taster_name": "Kerin O’Keefe",
  "taster_twitter_handle": "@kerinokeefe",
  "price": null,
  "designation": "Vulkà Bianco",
  "variety": "White Blend",
  "region_1": "Etna",
  "region_2": null,
  "province": "Sicily & Sardinia",
  "country": "Italy",
  "winery": "Nicosia"
}


POST /winemag-curl/_create/ehz-uIcB3hEJCQ5gKvTk
{
  "points": "87",
  "title": "Quinta dos Avidagos 2011 Avidagos Red (Douro)",
  "description": "This is ripe and fruity, a wine that is smooth while still structured. Firm tannins are filled out with juicy red berry fruits and freshened with acidity. It's  already drinkable, although it will certainly be better from 2016.",
  "taster_name": "Roger Voss",
  "taster_twitter_handle": "@vossroger",
  "price": 15,
  "designation": "Avidagos",
  "variety": "Portuguese Red",
  "region_1": null,
  "region_2": null,
  "province": "Douro",
  "country": "Portugal",
  "winery": "Quinta dos Avidagos"
}
Notice that you don’t need to inform the cluster host or any other options, such as content-type. You don’t even have to ask Kibana to format the result, since it does so by default.
You will need to inform the request body of each request, just below the request’s command (no blank lines).
Hint: if you select the JSON content and then CTRL+I Kibana will format it for you.
This is how you can index a single document in Elasticsearch. Typically, you’ll have more than only one document to index, and if you follow the approach we just outlined, you would have to send each individually to the cluster, generating a huge HTTP overhead cost and loads of manual work.
In the following sections we’ll teach you how to avoid the overhead by indexing a collection of documents at once, using other approaches.
Using the bulk API
If you have a collection of documents to index and you want to avoid as much of the HTTP overhead as you can, then you need to consider the bulk API. This API allows you to index, create, update, and even delete several documents in a single HTTP request. You can even mix these operations in your request.
Requests can be sent to the bulk API the same way as they were sent with the document index API, either through Kibana’s Dev Tool console, or via a command line utility. The difference here is that the request body is not a simple JSON anymore, but rather a newline delimited JSON (NDJSON). With NDJSON you can have several JSON documents in your request body, each one of them separated by a new line.
For bulk API requests, your body should follow this pattern:
action 1
optional action source 1
action 2
optional action source 2
action 3
optional action source 3
Where, each line is a JSON object and the file must end with an empty newline. The source of the action is optional because for deleted actions, you do not have to provide an action source. Yet, since we’re covering data ingestion, we’ll focus on the index and create actions.
We’ll take the two documents we used in the previous section and prepare a bulk-actions.ndjson file. You can extract them once again from the dataset by running the following jq commands:
jq -crM '.[0,1]' winemag-data-130k-v2.json | xargs -d$'\n' -I'{}' echo -e '{"index":{"_index":"winemag-bulk"}}\n{}' > bulk-actions.ndjsonWarning: the command above will work only with GNU xargs. If you are running macOS you’ll probably get an error saying the -d option is illegal. Please take a look here to find out how to solve this.
The command above will extract the first two elements from the array contained in the winemag-data-130k-v2.json file and pass them to the xargs command, which will then prepend the action JSON document before each source document, resulting in the following bulk actions:
{"index":{"_index":"winemag-bulk"}}
{"points":"87","title":"Nicosia 2013 Vulkà Bianco  (Etna)","description":"Aromas include tropical fruit, broom, brimstone and dried herb. The palate isn't overly expressive, offering unripened apple, citrus and dried sage alongside brisk acidity.","taster_name":"Kerin O’Keefe","taster_twitter_handle":"@kerinokeefe","price":null,"designation":"Vulkà Bianco","variety":"White Blend","region_1":"Etna","region_2":null,"province":"Sicily & Sardinia","country":"Italy","winery":"Nicosia"}
{"index":{"_index":"winemag-bulk"}}
{"points":"87","title":"Quinta dos Avidagos 2011 Avidagos Red (Douro)","description":"This is ripe and fruity, a wine that is smooth while still structured. Firm tannins are filled out with juicy red berry fruits and freshened with acidity. It's  already drinkable, although it will certainly be better from 2016.","taster_name":"Roger Voss","taster_twitter_handle":"@vossroger","price":15,"designation":"Avidagos","variety":"Portuguese Red","region_1":null,"region_2":null,"province":"Douro","country":"Portugal","winery":"Quinta dos Avidagos"
Hint: don’t forget to end the file with an empty newline.
Now that our bulk actions are ready, let’s send it to the bulk endpoint using curl:
curl -XPOST -H'Content-type: application/json' --data-binary @bulk-actions.ndjson -k -u elastic 'https://my.elasticsearch.host:9200/_bulk?pretty'
Enter host password for user 'elastic':
{
  "took" : 1589,
  "errors" : false,
  "items" : [
    {
      "index" : {
        "_index" : "winemag-bulk",
        "_id" : "exy6w4cB3hEJCQ5gavSl",
        "_version" : 1,
        "result" : "created",
        "_shards" : {
          "total" : 2,
          "successful" : 1,
          "failed" : 0
        },
        "_seq_no" : 0,
        "_primary_term" : 1,
        "status" : 201
      }
    },
    {
      "index" : {
        "_index" : "winemag-bulk",
        "_id" : "fBy6w4cB3hEJCQ5gavSl",
        "_version" : 1,
        "result" : "created",
        "_shards" : {
          "total" : 2,
          "successful" : 1,
          "failed" : 0
        },
        "_seq_no" : 1,
        "_primary_term" : 1,
        "status" : 201
      }
    }
  ]
}
You can see that both the documents we wanted to index in our bulk actions file were successfully created. Again, you could have sent the same request via Kibana’s Dev Tools console, but sometimes it’s easier to use the command line. If you were to send just a couple of documents, theDev Tools console would be a great option, but what if you needed to process an entire dataset file and generate bulk actions for all 130k documents? Then, we recommend that you come up with a command line or script solution, instead of pasting it into Kibana.
Hint: to prepare a bulk actions file for all 130k documents just remove the “0,1” index from the jq command and let it pass every array item to the xargs command.
Here, we can definitely index the whole dataset using the bulk API and consider the job done, since those are the only documents we need to index. But what if the dataset isn’t complete and new documents are constantly being added to it? Then we’d have two options: we could either manually control which new documents need to be indexed and do so using bulk API, or we could use an Elastic tool that would work perfectly in this scenario.
Using Filebeat
Filebeat is a lightweight solution provided by Elastic that helps to keep track of files and index their contents into Elasticsearch.
Filebeat works by configuring a filebeat.yml file with inputs and outputs. To demonstrate Filebeat in action we’ll create an empty file called winemag.ndjson, which will be our source of input documents. Filebeat will monitor this file and for every new entry that gets written to this file, it will send it to the configured outputs. In this example we’ll have only one output, which is our Elasticsearch cluster.
Start by simply creating an empty winemag.ndjson file:
touch winemag.ndjson
Now, we have to create a configuration file for Filebeat, but first we need to create an API key to connect Filebeat to Elasticsearch without having to provide user credentials. Create the filebeat-api_key.json file like this:
{
  "name": "filebeat",
  "role_descriptors": {
    "filebeat_writer": {
      "cluster": [
        "monitor",
        "read_ilm",
        "manage_ilm",
        "manage_index_templates",
        "read_pipeline"
      ],
      "index": [
        {
          "names": [
            "winemag-*"
          ],
          "privileges": [
            "auto_configure",
            "create_index",
            "manage",
            "view_index_metadata",
            "create_doc"
          ]
        }
      ]
    }
  }
}
Next, run the following command to generate an API key:
curl -XPOST -H'Content-type: application/json' --data-binary @filebeat-api_key.json -k -u elastic 'https://my.elasticsearch.host:9200/_security/api_key?pretty'
Enter host password for user 'elastic':
{
  "id" : "kRxixIcB3hEJCQ5gTvSe",
  "name" : "filebeat",
  "api_key" : "eQsXYZamSUCu3WlVQ0liAA",
  "encoded" : "a1J4aXhJY0IzaEVKQ1E1Z1R2U2U6ZVFzWFlaYW1TVUN1M1dsVlEwbGlBQQ=="
}
Remember to write down the id and api_key values returned by Elasticsearch in the format id:api_key:
iRxLxIcB3hEJCQ5gR_Sm:bOZJHYasS5u5b4qcubPMYg
Now, get the fingerprint for the CA certificate generated by Elasticsearch when you first bootstrapped it. If you are running Elasticsearch with Docker, you can run the following command to get it:
docker exec elasticsearch openssl x509 -fingerprint -sha256 -in config/certs/http_ca.crt | head -1 | cut -d= -f2 | sed 's/://g'
6CB14162122CDD31ED2DB966F0F193F9F605A04EF46162B4CFE6A858846545DD
We are going to pass both the id:api_key and the CA fingerprint values to the Filebeat executable via environment variables when we run the Docker container.
Create the following filebeat.yml configuration file:
setup.template:
  name: "winemag"
  pattern: "winemag"


filebeat.config:
  modules:
    path: ${path.config}/modules.d/*.yml
    reload.enabled: false


filebeat.inputs:
- type: filestream
  id: winemag
  paths:
    - /data/winemag.ndjson
  parsers:
    - ndjson:
        target: "doc"
        message_key: "log"


output.elasticsearch:
  protocol: "${ELASTICSEARCH_PROTOCOL}"
  hosts: "${ELASTICSEARCH_HOSTS}"
  api_key: "${ELASTICSEARCH_API_KEY}"
  index: "winemag-%{+yyyy.MM.dd}"
  ssl:
    enabled: true
    verification_mode: "certificate"
    ca_trusted_fingerprint: "${ELASTICSEARCH_SSL_CA_TRUSTED_FINGERPRINT}"
This is what a basic Filebeat will typically look like. It merely defines a filestream input source and a single Elasticsearch output.
Our input is a file that we are going to map inside the container. Our output is an Elasticsearch installation, to which we connect using an API key. We also configured Filebeat to generate indices with names prefixed by “winemag,” instead of the “filebeat” default.
Now that we have a Filebeat configuration file, we need to run Filebeat and, to make things easier, we’re going to use Docker. Use the following command to run a Filebeat Docker container:
docker run \
  --detach \
  --name=filebeat \
  --user=root \
  --volume="$(pwd)/filebeat.yml:/usr/share/filebeat/filebeat.yml:ro" \
  --volume="$(pwd)/winemag.ndjson:/data/winemag.ndjson:ro" \
  docker.elastic.co/beats/filebeat:8.6.2 \
  filebeat -e --strict.perms=false \
  -E output.elasticsearch.protocol="https" \
  -E output.elasticsearch.hosts=\["my.elasticsearch.host:9200"\] \
  -E output.elasticsearch.api_key="kRxixIcB3hEJCQ5gTvSe:eQsXYZamSUCu3WlVQ0liAA" \
  -E output.elasticsearch.ssl.ca_trusted_fingerprint="6CB14162122CDD31ED2DB966F0F193F9F605A04EF46162B4CFE6A858846545DD"
We’ve mapped both Filebeat’s configuration file and the winemag.ndjson documents file as volumes inside the container. You should provide values for the hosts, api_key, and ca_trusted_fingerprint environment variables according to your cluster installation.
Monitor the Filebeat container by running the command below. Open a new shell window and leave it running:
docker logs -f filebeat
Filebeat is now running and monitoring the winemag.ndjson file. Almost as soon as we add a new line (a new JSON document) to this file, Filebeat’s harvest will pull it and send it to the configured outputs.
jq -crM '.[0]' winemag-data-130k-v2.json >> winemag.ndjson
Filebeat will automatically create indices with the pattern “winemag-%{+yyyy.MM.dd},” however, to check if the index was created, run the following command:
curl -XGET -k -u elastic 'https://my.elasticsearch.host:9200/_cat/indices/winemag-*'
Enter host password for user 'elastic':
yellow open winemag-2023.04.28 LykhFet4TICykysqmHZiHw 1 1 1 0 12.6kb 12.6kb
After confirming the index was created, we can run the following search on the newly created index to check if the documents were indexed.
curl -XGET -k -u elastic 'https://my.elasticsearch.host:9200/winemag-2023.04.28/_search?size=1&pretty'
Enter host password for user 'elastic':
{
  "took" : 0,
  "timed_out" : false,
  "_shards" : {
    "total" : 1,
    "successful" : 1,
    "skipped" : 0,
    "failed" : 0
  },
  "hits" : {
    "total" : {
      "value" : 1,
      "relation" : "eq"
    },
    "max_score" : 1.0,
    "hits" : [
      {
        "_index" : "winemag-2023.04.27",
        "_id" : "lhxwxIcB3hEJCQ5ggvTO",
        "_score" : 1.0,
        "_source" : {
          "@timestamp" : "2023-04-27T20:38:38.724Z",
          "log" : {
            "offset" : 0,
            "file" : {
              "path" : "/data/winemag.ndjson"
            }
          },
          "doc" : {
            "designation" : "Vulkà Bianco",
            "title" : "Nicosia 2013 Vulkà Bianco  (Etna)",
            "description" : "Aromas include tropical fruit, broom, brimstone and dried herb. The palate isn't overly expressive, offering unripened apple, citrus and dried sage alongside brisk acidity.",
            "taster_name" : "Kerin O’Keefe",
            "taster_twitter_handle" : "@kerinokeefe",
            "country" : "Italy",
            "points" : "87",
            "province" : "Sicily & Sardinia",
            "variety" : "White Blend",
            "region_1" : "Etna",
            "winery" : "Nicosia"
          },
          "input" : {
            "type" : "filestream"
          },
          "ecs" : {
            "version" : "8.0.0"
          },
          "host" : {
            "name" : "94bee1f79b7c"
          },
          "agent" : {
            "id" : "404266a1-c8ab-4e30-b817-9399d8db796b",
            "name" : "94bee1f79b7c",
            "type" : "filebeat",
            "version" : "8.6.2",
            "ephemeral_id" : "322da609-17a2-4c22-af32-0cdf713b1d11"
          }
        }
      }
    ]
  }
}
Filebeat will continue to monitor our input file for new entries. To iterate over all 130k documents and send them one by one to the input file in 1 second intervals, run the following one liner. Then, monitor the “winemag-%{+yyyy.MM.dd}” directly in Kibana to watch it grow.
for i in {1..$(jq -crM '. | length' winemag-data-130k-v2.json)}; do jq -crM ".[$i]" winemag-data-130k-v2.json >> winemag.ndjson; sleep 1; doneProgrammatically through a language specific library
Elastic provides client libraries for the most used programming languages. You can find official libraries for Python, Javascript, Golang, Rust, PHP, Java, and many more.
Even though solutions like Filebeat and Logstash offer ways of processing incoming data, sometimes it is simply easier to use a programming language you are familiar with. Another reason to use a client library would be when you want to integrate the indexing of a document (or a collection of documents) into your existing application.
You should definitely review the official documentation for the client of your programming language of choice. Here’s an overview on how you would start a Python project that indexes a single document (which we already did using different approaches in the previous sections). You will need a Python installed in your system and we are also going to use Pipenv, a tool that helps isolate your Python projects dependencies.
First, let’s create a directory and initial files:
mkdir winemag-python
cd winemag-python
touch app.py
The next step is to install the elasticsearch package. Run the command below to install it in your Pip environment:
pipenv install elasticsearch
Now, create and insert the code below into the app.py file we created:
import json
from elasticsearch import Elasticsearch


ELASTICSEARCH_HOST = "https://my.elasticsearch.host:9200"
ELASTICSEARCH_SSL_FINGERPRINT = (
    "6CB14162122CDD31ED2DB966F0F193F9F605A04EF46162B4CFE6A858846545DD"
)
ELASTICSEARCH_API_KEY_ID = "kRxixIcB3hEJCQ5gTvSe"
ELASTICSEARCH_API_KEY_KEY = "eQsXYZamSUCu3WlVQ0liAA"
INDEX = "winemag-2023.04.28"
DATASET_FILE = "../winemag-data-130k-v2.json"


def main():
    with open(DATASET_FILE) as file:
        documents = json.load(file)


    print(len(documents))


    es_client = Elasticsearch(
        ELASTICSEARCH_HOST,
        ssl_assert_fingerprint=ELASTICSEARCH_SSL_FINGERPRINT,
        api_key=(ELASTICSEARCH_API_KEY_ID, ELASTICSEARCH_API_KEY_KEY),
    )


    print(es_client.info())
    print(es_client.index(index=INDEX, document=documents[0]))


if __name__ == "__main__":
    main()
Remember to change the constant values in the beginning of the file to the correct local environment valuesIf you are following along, you can use the values we gathered in the previous section.
This is just a simple Python script to demonstrate how you could connect to your Elasticsearch cluster and index a single document from the JSON dataset. If you run the command below you should see two responses from the cluster printed in your screen: general cluster information and the result of the document index operation.
pipenv run python app.py
{'name': 'ac964fb09331', 'cluster_name': 'es', 'cluster_uuid': '7Edx9d4PTq6l2W6Nq-UtbA', 'version': {'number': '8.6.2', 'build_flavor': 'default', 'build_type': 'docker', 'build_hash': '2d58d0f136141f03239816a4e360a8d17b6d8f29', 'build_date': '2023-02-13T09:35:20.314882762Z', 'build_snapshot': False, 'lucene_version': '9.4.2', 'minimum_wire_compatibility_version': '7.17.0', 'minimum_index_compatibility_version': '7.0.0'}, 'tagline': 'You Know, for Search'}
{'_index': 'winemag-2023.04.28', '_id': 'lxxwyYcB3hEJCQ5gq_TY', '_version': 1, 'result': 'created', '_shards': {'total': 2, 'successful': 1, 'failed': 0}, '_seq_no': 0, '_primary_term': 1}
Through Kibana’s import wizard
The last approach to ingest data into an Elasticsearch cluster we are going to cover here is actually one of the easiest ways we can ingest a collection of documents.
Kibana’s wizard feature allows you to import CSV and JSON files. You just upload a dataset file and Kibana can usually index the documents for you.
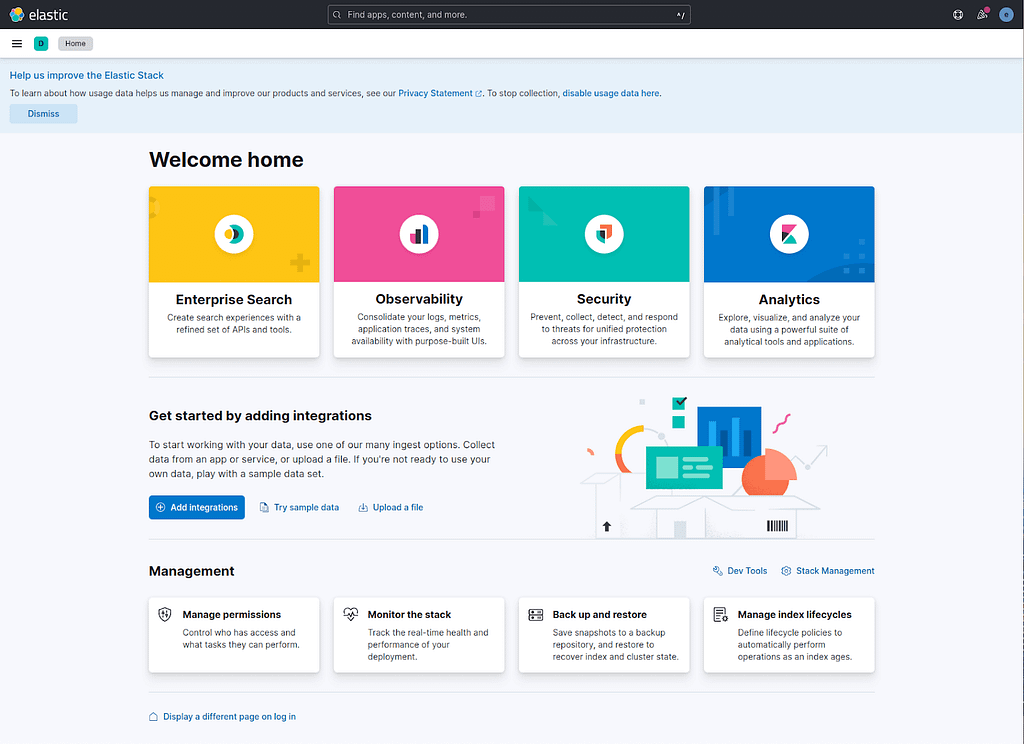
You can find this feature on the homepage of your Kibana installation. Just look for the “Upload a file” option.
You’ll be asked to upload a file. This file can either be a CSV/TSV file, a newline delimited JSON, or a file containing common log format entries, such as the ones you’ll find in syslog, Apache log, and so on. However, the file cannot be larger than 100 megabytes.
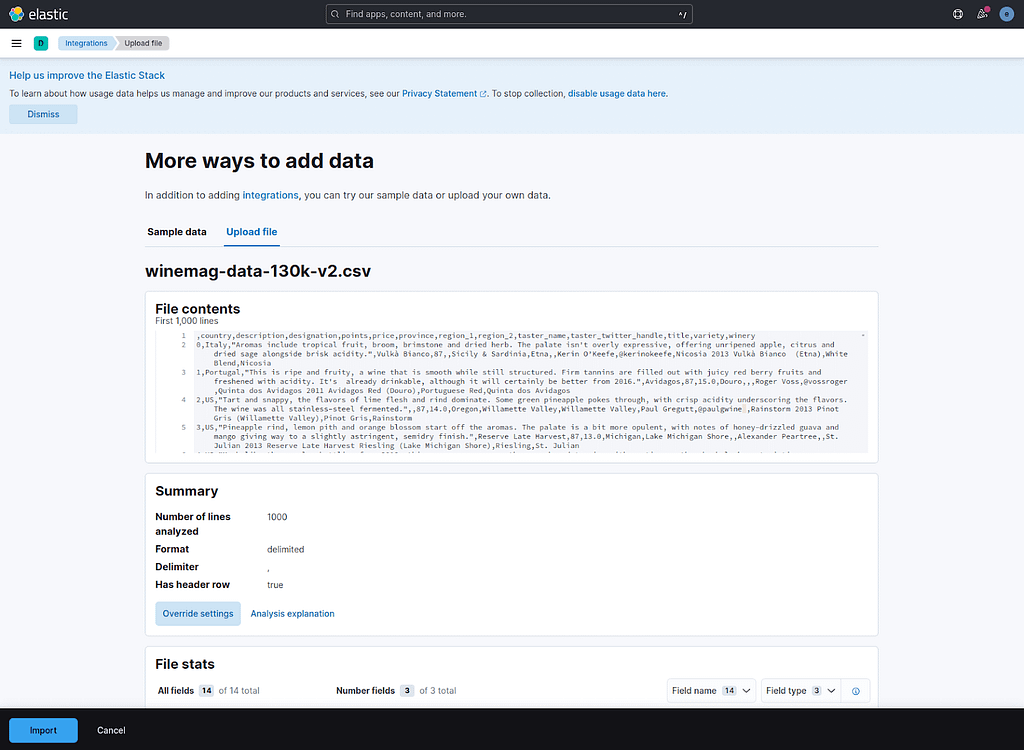
Now we have a small problem. The dataset we’ve been using is neither a CSV or a NDJSON – it is a JSON file. The documents inside of it are not organized one per line, they are all contained inside a JSON array, meaning, Kibana will display an error message if you try to upload the winemag-data-130k-v2.json file. Thankfully, the archive we’ve downloaded from Kaggle.com came with the same document collection in CSV format. So, we are going to use the winemag-data-130k-v2.csv file instead.
Just upload it and wait for Kibana to parse it. Kibana will display a preview like the one in the screenshot below. You can tweak the import process a little, but for the purpose of this example, we will leave it as is.
Click on the Import button on the bottom of the screen.
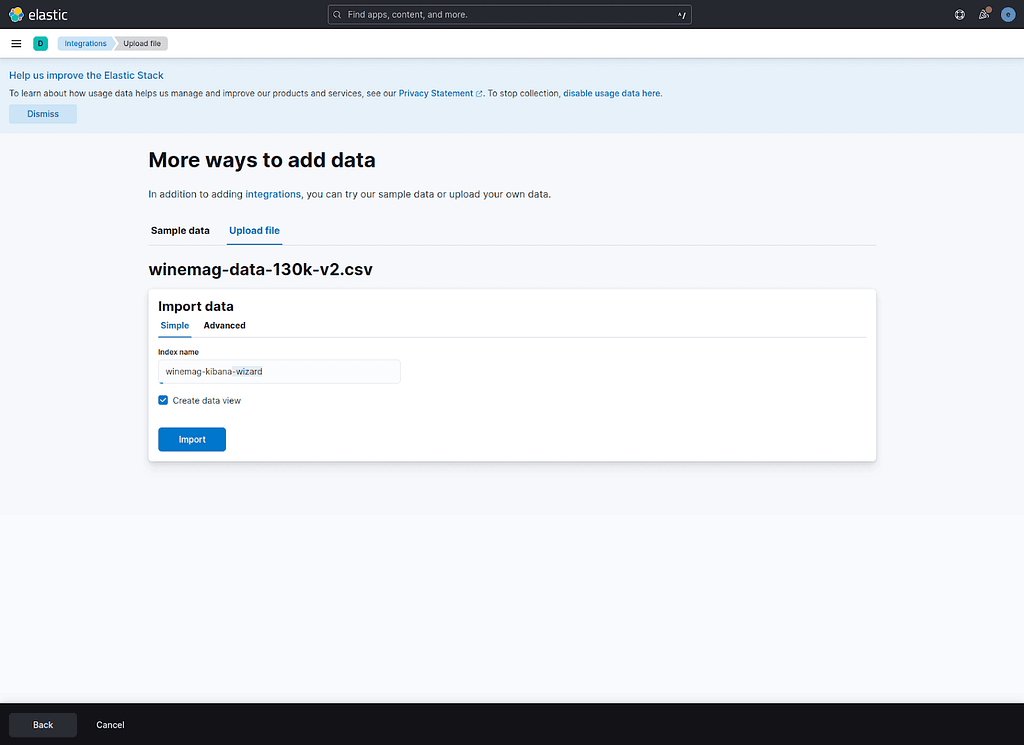
Kibana will then ask you in which index you want to index the documents from the dataset file. We are going to index them in the winemag-kibana-wizard index. Click on the Import button and wait forKibana to finish the import process.
Everything should run just fine and all the documents should be indexed.
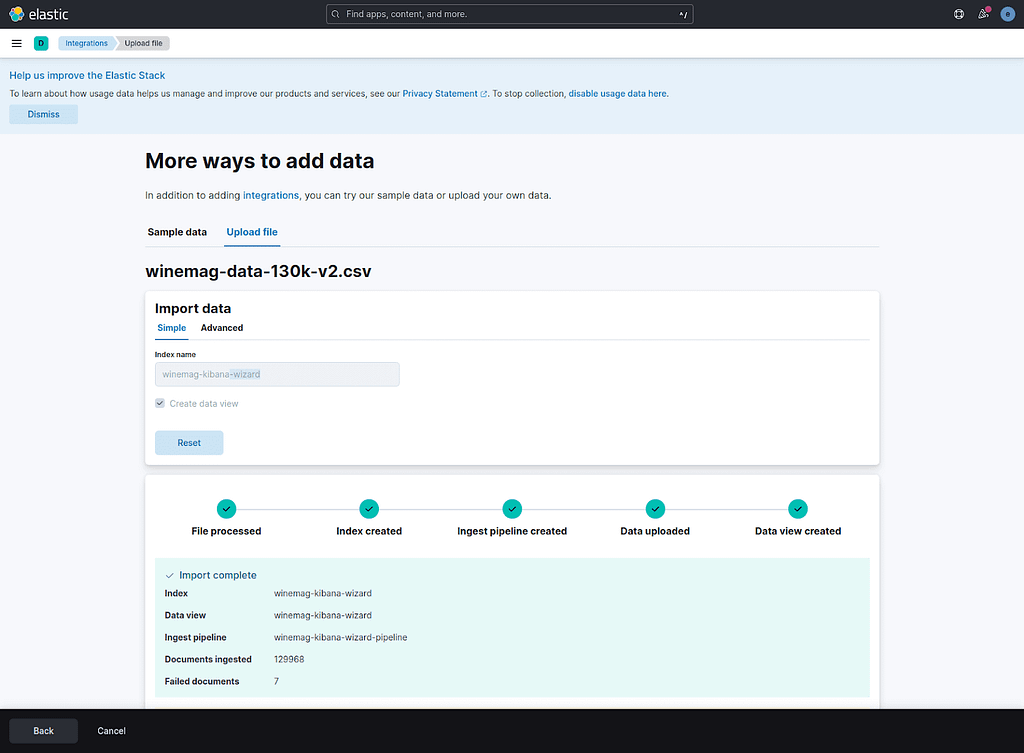
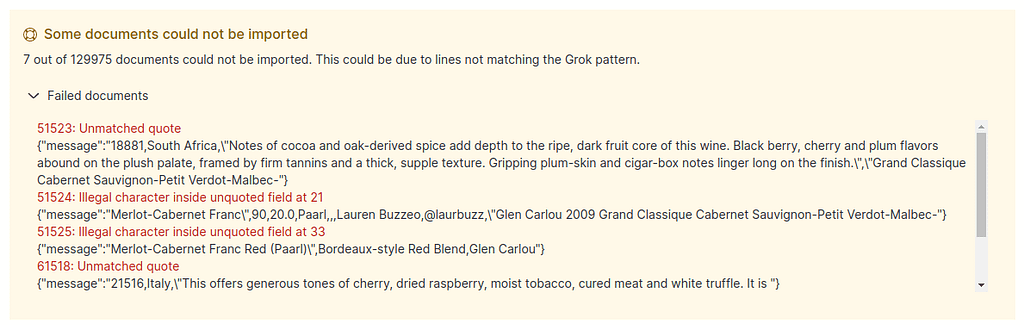
Well, almost. You can see in the results screen that Kibana couldn’t index 7 documents out of almost 130k. If you scroll down you can take a look at the failed documents and you’ll see that they failed because of missing quotes or parsing errors. Those documents should be double-checked before being indexed and when the issues are resolved, we can use any approach to index them.
Test environment
If you are planning to follow the actions above, make sure you set up a test environment conducive to running the commands we’re performing here. The test environment needs to include both a functional Elasticsearch cluster and a dataset, which will be used to ingest data into the cluster.
Bringing up a test environment with Docker
To create a test environment, we’ll use Docker. If you already have a test environment, or if you’d prefer to create it some other way (for example, by running the binaries manually or by creating a small deployment in Elastic Cloud), feel free to skip this section.
If you are following along with this walkthrough, we’ll assume that you’ve installed a Docker engine in your system. If you haven’t, take a look at the Docker’s installation page to find out how you can access it for your system.
Start by creating the following resources:
docker network create elastic


docker volume create esdata
Then, bring an Elasticsearch container up by running the command below. This may take a while to complete, if an image has to be pulled from the Docker repository first, but that will only happen once.
If you look closely at the command, you’ll see that we are mapping the volume we just created (so we can destroy this container and bring a new one up, preserving all the data). We are also using the network we created, which is how the Kibana container will communicate with the cluster. This instance will be run as a single node and not a cluster, which is ideal for this demo. Finally, the amount of heap memory the service could allocate was limited to 2GB:
docker run \
	--detach\
	--interactive \
	--tty \
	--restart always \
	--name elasticsearch \
	--network elastic \
	--volume esdata:/usr/share/elasticsearch/data \
	--publish 9200:9200 \
	--publish 9300:9300 \
	--env ES_JAVA_OPTS="-Xms2g -Xmx2g" \
	--env ES_SETTING_DISCOVERY_TYPE=single-node \
	--env ES_SETTING_CLUSTER_NAME=es \
	docker.elastic.co/elasticsearch/elasticsearch:8.6.2
You’ll have to wait until the service inside the container is up and running. Do this by following the container logs and wait for a message indicating it’s ready to receive connections:
docker logs -f elasticsearch
Once that’s done t, the first thing you should do is reset the password for the elastic user by running the command below and following the instructions:
docker exec -it elasticsearch /usr/share/elasticsearch/bin/elasticsearch-reset-password -u elastic -i
Then, test the connectivity with the cluster by running the command below and providing the newly created password. You should see this message:
curl https://localhost:9200/ -k -u elastic


Enter host password for user 'elastic':
{
  "name" : "ac964fb09331",
  "cluster_name" : "es",
  "cluster_uuid" : "7Edx9d4PTq6l2W6Nq-UtbA",
  "version" : {
    "number" : "8.6.2",
    "build_flavor" : "default",
    "build_type" : "docker",
    "build_hash" : "2d58d0f136141f03239816a4e360a8d17b6d8f29",
    "build_date" : "2023-02-13T09:35:20.314882762Z",
    "build_snapshot" : false,
    "lucene_version" : "9.4.2",
    "minimum_wire_compatibility_version" : "7.17.0",
    "minimum_index_compatibility_version" : "7.0.0"
  },
  "tagline" : "You Know, for Search"
}
Now that you have an instance of Elasticsearch running, it’s time to bring a Kibana instance up. Run the command below:
docker run \
	--restart always \
	--interactive \
	--tty \
	--detach \
	--name kibana \
	--network elastic \
	--publish 5601:5601 \
	docker.elastic.co/kibana/kibana:8.6.2
Next, check the container’s logs to retrieve the public URL along with the access code generated by Kibana. Run the command below to access the URL, it should look like the one here:
docker logs kibana


...
i Kibana has not been configured.


Go to http://0.0.0.0:5601/?code=820824 to get started.
Almost there! Now, go to that URL. You’ll be prompted to provide an enrollment token. This token is generated and printed out by Elasticsearch the first time the cluster is brought up. However, we can always generate a new token by running the command below:
docker exec -it elasticsearch bin/elasticsearch-create-enrollment-token --scope kibana


eyJ2ZXIiOiI4LjYuMiIsImFkciI6WyIxNzIuMTguMC4yOjkyMDAiXSwiZmdyIjoiNmNiMTQxNjIxMjJjZGQzMWVkMmRiOTY2ZjBmMTkzZjlmNjA1YTA0ZWY0NjE2MmI0Y2ZlNmE4NTg4NDY1NDVkZCIsImtleSI6Il9oYU9ENGNCM2hFSkNRNWctakR1OnB1bHNYb2ZoVDltQnhGenpxVndiWlEifQ==
Go back to your web browser and fill in the token information. If done correctly, you should be able to log in with the elastic user and the password you reset.
Getting a dataset from Kaggle.com
By now, you should have a test environment available. If so, it’s time to fill in some data.
For the purpose of this demo, we are going to be using a readily available dataset from Kaggle.com. Kaggle.com is a well-known platform for people interested in data science and machine learning. Users upload curated datasets and anyone can download and experiment with data analysis, algorithms, and so on. We will be using the Wine Reviews dataset.
Visit the dataset’s page, download it, and extract it to a folder. It contains a couple of files, but we’ll only be using the winemag-data-130k-v2.json file.
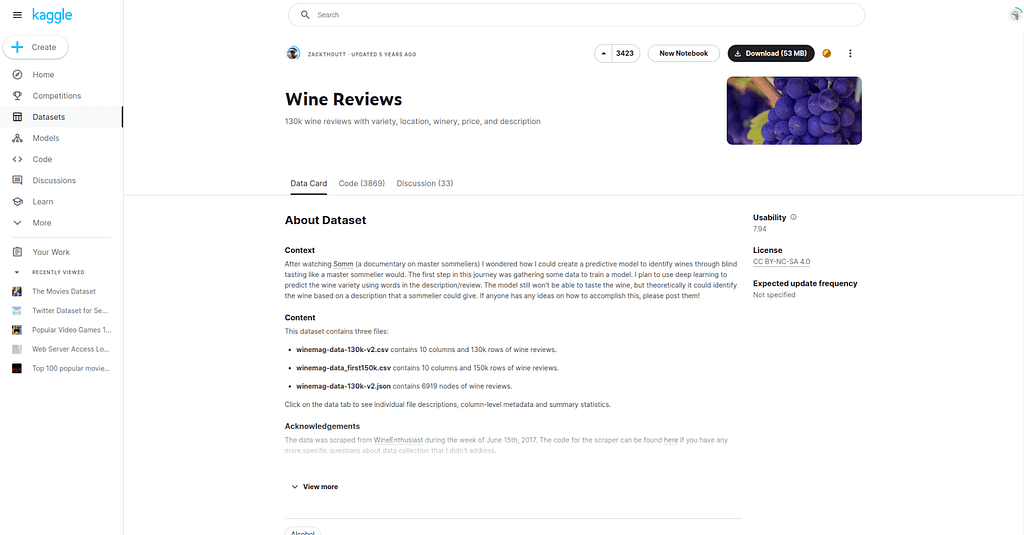
After the dataset is downloaded, extract the package and take a look at the winemag-data-130k-v2.json file. This file contains a huge JSON array with many (almost 130k) documents.
This is what a single document from this dataset looks like:
{
  "points":"87",
  "title":"Nicosia 2013 Vulk\u00e0 Bianco  (Etna)",
  "description":"Aromas include tropical fruit, broom, brimstone and dried herb. The palate isn't overly expressive, offering unripened apple, citrus and dried sage alongside brisk acidity.",
  "taster_name":"Kerin O\u2019Keefe",
  "taster_twitter_handle":"@kerinokeefe",
  "price":null,
  "designation":"Vulk\u00e0 Bianco",
  "variety":"White Blend",
  "region_1":"Etna",
  "region_2":null,
  "province":"Sicily & Sardinia",
  "country":"Italy",
  "winery":"Nicosia"
}
Conclusion
As you can see there are many ways to ingest data into an Elasticsearch cluster. Other than the approaches outlined here, there are still other complex ETL tools, like Logstash and Fluentd, which would allow you to create a data ingestion layer with high-availability and more advanced features. As usual, when it comes to Elastic, the best option depends on your actual needs, team skills, performance threshold, and risk tolerance.