
Quick links
Introduction
Cold storage is an AWS OpenSearch service feature that takes the UltraWarm feature to the next level. You can store any volume of data in cold storage, which is backed by Amazon S3.
Unlike UltraWarm storage, cold storage has no compute attached, you must selectively mount your cold data into UltraWarm nodes to make it searchable, which makes this storage the perfect option for:
- Data that you do not need to update, such as logs
- Data that is searched very occasionally
- Periodic reports
- Meeting data compliance.
You can manage your cold stored indices manually or by using Index State Management (ISM).
Prerequisites
There are some conditions your cluster needs to meet to be able to utilize cold storage nodes:
- Cold storage and UltraWarm storage are only available on AWS OpenSearch, these features cannot be used on self-installed OpenSearch.
- UltraWarm requires OpenSearch or Elasticsearch 7.9 or higher.
- You also need UltraWarm nodes deployed on the same domain.
- Dedicated master nodes are needed.
- The domain cannot use T2 or T3 instances for data nodes.
- If the index uses kNN (index.knn: true), it can’t be moved to warm storage.
- Users need to have the cold_manager role in order to manage cold indices. The process for creating that role is described below.
Creating the cold_manager role
In some cases, the cold_manager role may not exist, so you must create it manually using the following configurations:
Action Groups
| Group name | Permissions |
|---|---|
| cold_cluster | - cluster:monitor/nodes/stats - cluster:admin/ultrawarm* - cluster:admin/cold/* |
| cold_index | - indices:monitor/stats - indices:data/read/minmax - indices:admin/ultrawarm/migration/get - indices:admin/ultrawarm/migration/cancel |
Then, create the cold_manager role with the following settings:
Cluster permissions: cold_cluster
Index: *
Index permissions: cold_index
After creating the cold_manager role, you can use role mappings to apply it to the users who will interact with the cold-storage-based indices.
To learn more about users and permissions in OpenSearch, you can read more here: OpenSearch Security – Access Control (Users, Roles, Permissions…).
Using cold storage
To start using cold storage, you first need to enable the feature in the OpenSearch service console when creating the domain (as shown in the screenshot below). You can also add cold storage features to existent domains if they meet the prerequisites listed above.
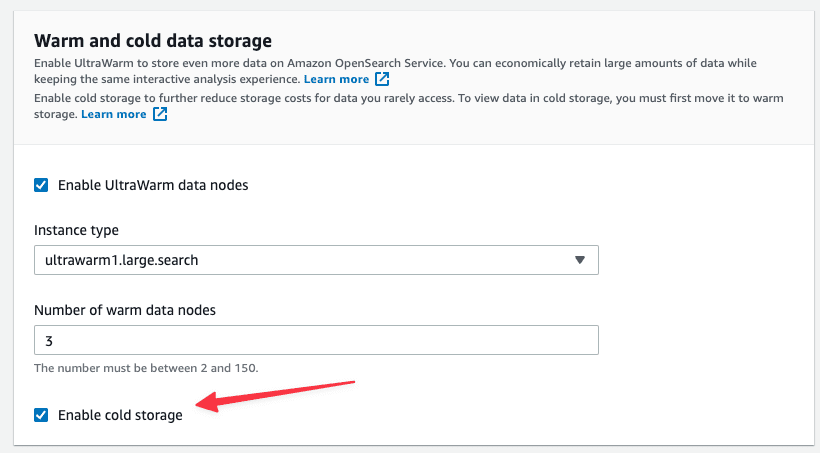
The ‘enable dedicated master nodes’ option must be selected as well.
Let’s start creating an index and adding some documents to it:
POST my_cold_index/_doc
{
"@timestamp": "2022-09-09",
"user": "Gustavo Llermaly"
}
After creating the index, we must move it to the UltraWarm storage to make it cold storage eligible:
POST _ultrawarm/migration/my_cold_index/_warm
We can check the migration status using this command:
GET _ultrawarm/migration/cold_index/_status
Manually moving indices to cold storage
When moving indices to cold storage, you must set a time range to make discovery easier. If you define a timestamp field, then the start and end dates will be defined by the max and minimum values of that field.
| Parameter | Supported value | Description |
|---|---|---|
| timestamp_field | The date/time field from the index mapping. | The minimum and maximum values of the provided field are computed and stored as the start_time and end_time metadata for the cold index. |
| start_time and end_time | One of the following formats: - strict_date_optional_time. For example, yyyy-MM-dd'T'HH:mm:ss.SSSZ or yyyy-MM-dd - Epoch time in milliseconds | The provided values are stored as the start_time and end_time metadata for the cold index. In this case, you must be careful to set the correct dates since no checks are applied to ensure the dates correspond to your data. |
If you don’t want to specify a timestamp, add ?ignore=timestamp to the request instead.
POST _ultrawarm/migration/my_cold_index/_cold
{
    "timestamp_field": "@timestamp"
}
The index must be green for the migration to succeed.
To get the status of the migration:
GET _ultrawarm/migration/my_cold_index/_status
After the index has been moved to cold storage, it will not be searchable.
Listing cold indices
Note that the command GET _cat indices does not work for cold storage. Instead, you must use the following command:
GET _ultrawarm/migration/my_cold_index/_status
You also have the option to add a time filter to the above command:
GET _cold/indices/_search
{
  "filters": {
    "time_range": {
      "start_time": "2020-01-01",
      "end_time": "2021-03-01"
    }
  }
}
Searching a cold storage index
If you want to search a cold storage index, you must move it to UltraWarm storage to make it searchable:
POST _cold/migration/_warm
 {
 "indices": "my_cold_index"
 }
To check the status of the migration, you can run the following command:
GET _cold/migration/my_cold_index/_status
Once in UltraWarm, you can search like a normal index:
GET my_cold_index/_search

Canceling migration
Migrations work in a queue. If a migration hasn’t started yet, you can remove it from the queue:
POST _ultrawarm/migration/_cancel/my_cold_index
Deleting cold indices
You cannot delete a cold index in the normal way; instead, you must run:
DELETE _cold/my_cold_index
Automatically moving indices
The recommended way to work with cold storage is not to move indices manually but to use ISM (Index State Management) policies instead.
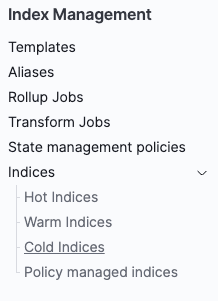
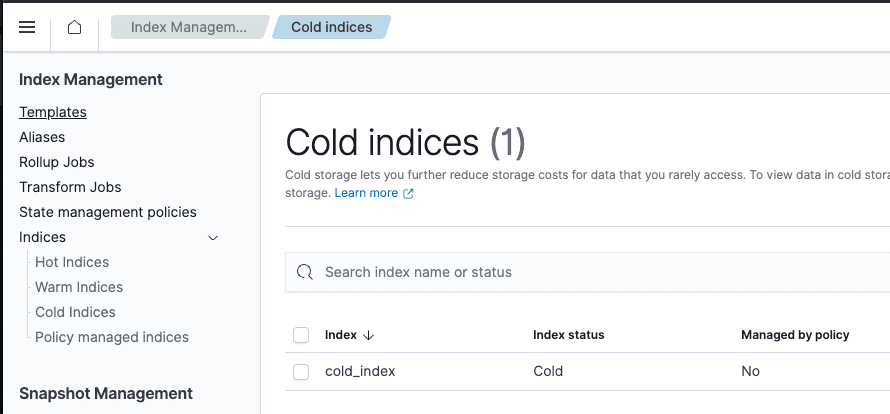
Using index management, you will see your warm and cold indices in different sections:
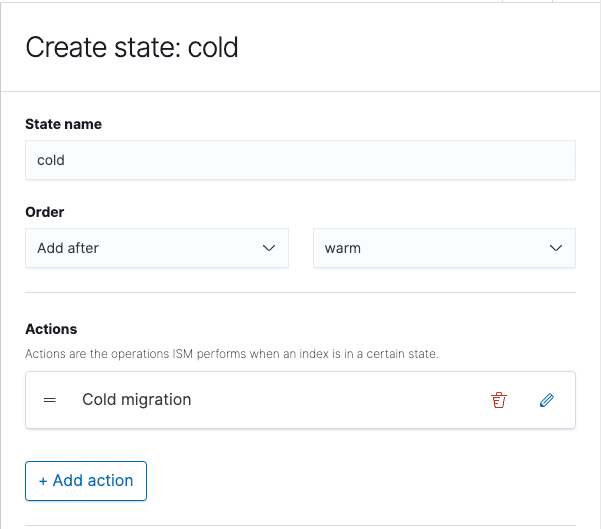
You can go ahead and create a new ISM policy, or edit an existing one, and add the “cold migration” action to the cold state.
The following JSON shows the example hot/warm policy from our UltraWarm article, but now, in addition to reducing replicas and migrating the data to warm storage, we will move it to the cold zone instead of deleting:
{
  "policy": {
    "description": "Hot/Warm/Cold example",
    "schema_version": 1,
    "error_notification": {
      "channel": {
        "id": "tmHzgYEB62Ttjfftxmj-"
      },
      "message_template": {
        "source": "Index {{ctx.index}} failed",
        "lang": "mustache"
      }
    },
    "default_state": "hot",
    "states": [
      {
        "name": "hot",
        "actions": [
          {
            "retry": {
              "count": 3,
              "backoff": "exponential",
              "delay": "1m"
            },
            "rollover": {
              "min_index_age": "30d",
              "min_primary_shard_size": "50gb"
            }
          }
        ],
        "transitions": [
          {
            "state_name": "warm",
            "conditions": {
              "min_rollover_age": "7d"
            }
          }
        ]
      },
      {
        "name": "warm",
        "actions": [
          {
            "retry": {
              "count": 3,
              "backoff": "exponential",
              "delay": "1m"
            },
            "replica_count": {
              "number_of_replicas": 0
            }
          },
          {
            "retry": {
              "count": 3,
              "backoff": "exponential",
              "delay": "1m"
            },
            "warm_migration": {}
          }
        ],
        "transitions": [
          {
            "state_name": "cold",
            "conditions": {
              "min_rollover_age": "15d"
            }
          }
        ]
      },
      {
        "name": "cold",
        "actions": [
          {
            "retry": {
              "count": 3,
              "backoff": "exponential",
              "delay": "1m"
            },
            "cold_migration": {
              "start_time": null,
              "end_time": null,
              "timestamp_field": "@timestamp",
              "ignore": "none"
            }
          }
        ],
        "transitions": []
      }
    ],
    "ism_template": [
      {
        "index_patterns": [
          "datalogs-*"
        ],
        "priority": 100
      }
    ]
  }
}
The order of the actions is important here. If you execute the warm_migration action before the replica_count, the policy will fail.
Conclusion
With cold storage, AWS OpenSearch provides an advanced and efficient storage solution that complements the existing UltraWarm feature perfectly. This service enables you to cost-effectively store infrequently searched data. What’s more, cold storage can handle any volume of data.
Although cold storage cannot be considered a 100% online storage solution, the migration to warm storage to make the data searchable is quick and convenient. Transitioning data between cold and warm storage is a simple process using migrate APIs or Index State Management tools. This ease of movement facilitates a seamless hot/warm/cold data flow, optimizing storage management and minimizing costs.